Terraria: from a wooden shelter to your first boss victory
Build a dependable Terraria start with valid housing, safe cave routes, mobility upgrades, a first-boss arena, potion preparation, and an Eye of Cthulhu plan.
Take these into your next session
- Make housing, storage, light, and a safe return route work before deep mining.
- Treat movement accessories, health, and an arena as part of your boss equipment.
- Prepare one sustainable ranged attack and learn the Eye of Cthulhu’s movement.
What this guide covers Standard pre-Hardmode progression in an ordinary world, primarily Classic difficulty. Expert, Master, Journey settings, and secret seeds change encounters and expectations. Early boss names are included; late-game progression is outside the guide.
Terraria becomes much easier when exploration produces a better next expedition. A longer health bar, a movement accessory, a labeled chest, and a safe cave entrance can matter more than a backpack filled with unrelated ore. Your first boss is the point where those small systems come together.
This guide builds toward the Eye of Cthulhu as a practical early target. It is not the only possible first boss, and you do not need an exact item checklist or a rare drop to begin. The plan gives you a safe home, repeatable resource trips, and an arena that lets you learn the fight instead of losing it to terrain.
1. Choose settings that support learning
Character difficulty and world difficulty are different choices. A Classic character normally drops coins on death, while Mediumcore drops carried items and Hardcore makes death permanent. World difficulty changes enemy strength, rewards, and sometimes boss behavior. For a first ordinary playthrough, a Classic character in a Classic world is a clear baseline.
World size affects travel and exploration time. Smaller worlds make many trips shorter; larger ones offer more space but can require longer routes. Choose based on the experience you want rather than assuming the largest map is automatically best. Secret seeds can alter progression substantially and are better treated as their own challenge.
Learn the inventory, crafting, smart cursor, quick-heal, and quick-buff controls. Practice placing platforms and rope safely. Terraria has enough useful shortcuts that learning a few early can remove a surprising amount of friction without changing the game itself.
Avoid repeatedly generating new worlds for a perfect opening chest. A good ordinary start is enough to learn, and adapting to what you find is part of the loop. If the initial terrain is awkward, moving the first shelter a little can solve more than searching for a supposedly ideal seed.
2. Finish a useful house before digging too far
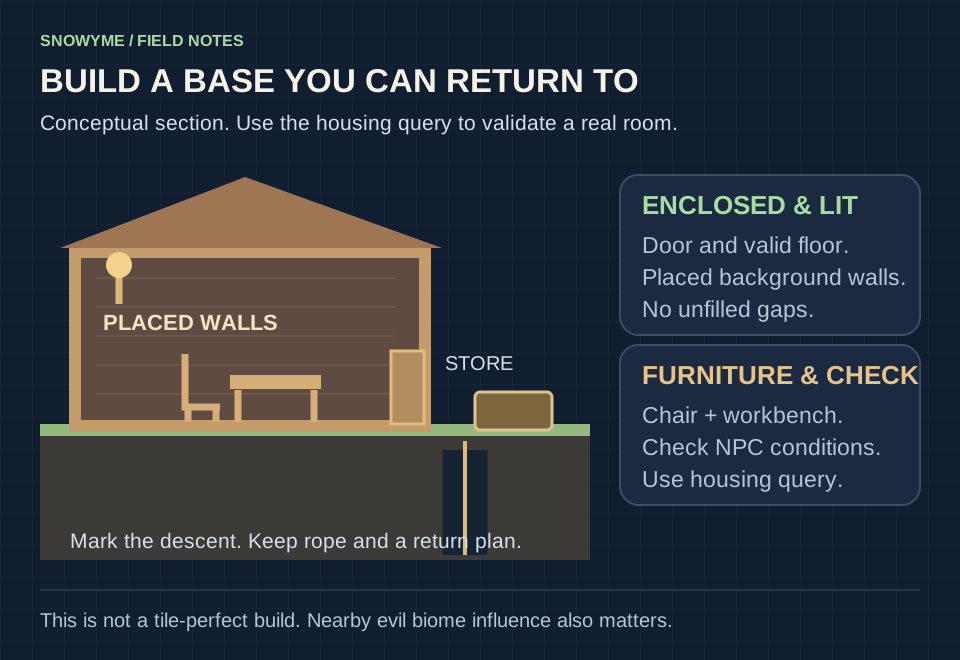
Collect wood, build a workbench, and create a small enclosed room near a manageable surface area. Add player-placed background walls, a light source, a door or other valid entrance, and the furniture needed for suitable NPC housing. A chair plus a workbench can satisfy the basic furniture roles in a standard simple room.
A roughly ten-block-wide, six-block-high outer rectangle is a useful starting footprint, but suitability depends on the completed interior and layout, not the sketch alone. Leave valid floor space and do not assume a room made entirely of platforms or missing background walls is acceptable. Use the housing query tool to check the actual room.
Natural background walls do not automatically create safe, valid housing. Fill gaps with the appropriate placed walls and check for openings. A dark underground cavity may look enclosed while still allowing unwanted spawning or failing the housing check.
Build a few nearby rooms as resources allow, then organize chests by purpose: materials, equipment, potions, and items to investigate. Housing alone does not summon every NPC; characters also have arrival conditions. Ask the Guide about a material’s crafting uses instead of selling unfamiliar items before learning what they can become.
3. Explore the surface with a return route
Travel in one direction at a time and note major obstacles. Carry torches, wood, rope, platforms, and a way home if you have found one. A Recall Potion or Magic Mirror is valuable, but do not build your first expedition around an item you do not yet own.
Loot accessible chests and pots while watching the terrain. Movement accessories, healing items, and useful weapons can change your next trip more than a small ore deposit. Read accessory effects and equip them deliberately; finding an item is not enough if it remains unused in the backpack.
Cross gaps with controlled bridges or rope rather than blind jumps. Mark entrances you want to revisit. If a region’s enemies are far beyond your current equipment, turn back and collect another upgrade elsewhere. Exploration is productive when you return with what you found.
Treat the Dungeon entrance with particular care. Going deep into the Dungeon before its intended boss gate is cleared can trigger an overwhelmingly dangerous guardian. It is not an ordinary beginner cave to push through by bringing more healing. Other dangerous biomes also deserve a different preparation plan from the forest around your house.
4. Mine for complete upgrades instead of random quantities
Build a controlled descent with platforms or rope so the trip back is not harder than the trip down. Light junctions and watch for pressure plates, dart traps, boulders, and explosive hazards. A torch helps you inspect the space; it does not disable the trap you just revealed.
Gather stone and accessible ore, then return to craft a furnace and an appropriate anvil as you obtain the materials. Different worlds contain alternate ore families, such as iron or lead. Both can serve corresponding progression roles, so a guide naming one does not mean your world is missing the necessary resource.
Look for Life Crystals and useful cave chests. In standard progression each Life Crystal increases maximum health by 20, up to the normal pre-Hardmode crystal limit of 400. Use health upgrades while staying aware that increasing readiness can also meet conditions for natural events; an unexpected boss warning is a reason to prepare your surface area.
Choose one concrete crafting target before continuing underground: a better bow, an armor piece, enough materials for a grappling hook option, or a tool improvement. You do not need to complete every ore armor tier in sequence if a usable set and accessories already support your next objective.
5. Build mobility before maximizing damage
A faster weapon helps only while you can stay alive and keep attacking. Running boots or a comparable movement accessory, an extra-jump option, and a grappling hook can make ordinary caves and boss attempts much more controllable. These items have multiple sources or alternatives, so work with what you find.
Practice the hook and jumps outside combat. Learn the distance you can cross and how to detach or change direction. Equipping an unfamiliar mobility item immediately before summoning a boss can create mistakes that have nothing to do with the enemy.
Keep accessory slots filled with useful effects, but check whether similar effects actually stack. Later combining systems can free slots; you do not need to solve the entire endgame accessory tree during the first evening. Use the Guide and item descriptions to make the next practical improvement.
If you lack a rare mobility drop, improve the terrain instead. A longer platform lane, fewer obstacles, and convenient access between levels can compensate for some missing tools. The arena is equipment you build into the world.
6. Prepare a sustainable attack for the Eye
Pick a weapon you can use while moving and that reliably reaches the boss. A reasonably upgraded bow with an ample arrow supply is an accessible example. Other ranged, magic, or suitable melee options can work, but each has its own ammunition, mana, range, or exposure problem to solve.
Test the attack on ordinary enemies. Can you aim while running? Does the projectile reach moving targets? Can you maintain it through a whole attempt, or do you immediately run out of ammunition or mana? A theoretical high-damage weapon is not useful if your resource supply supports only a few seconds.
| Preparation | Practical target | Why it matters |
|---|---|---|
| Health and armor | Several health upgrades and a coherent usable armor set | Gives you room to learn rather than losing to one short mistake. |
| Main weapon | A familiar attack with enough ammunition or resources | Sustained damage matters more than a brief impressive opening. |
| Mobility | A workable jump/run setup and rehearsed controls | Helps you avoid charges while continuing to attack. |
| Arena | Clear platform lanes, light, and recovery support | Prevents terrain from deciding the fight before you understand it. |
| Consumables | Healing plus available food and useful buffs | Improves survivability, while healing cooldown still requires avoidance. |
For a comfortable first attempt, reaching around 200 maximum health or more is a useful preparation goal rather than a guarantee. More experienced players can succeed with less, and higher world difficulties demand different expectations. If natural spawn conditions are met, the boss may arrive before your planned manual attempt, so build the arena early.
7. Create an arena you can navigate without looking down
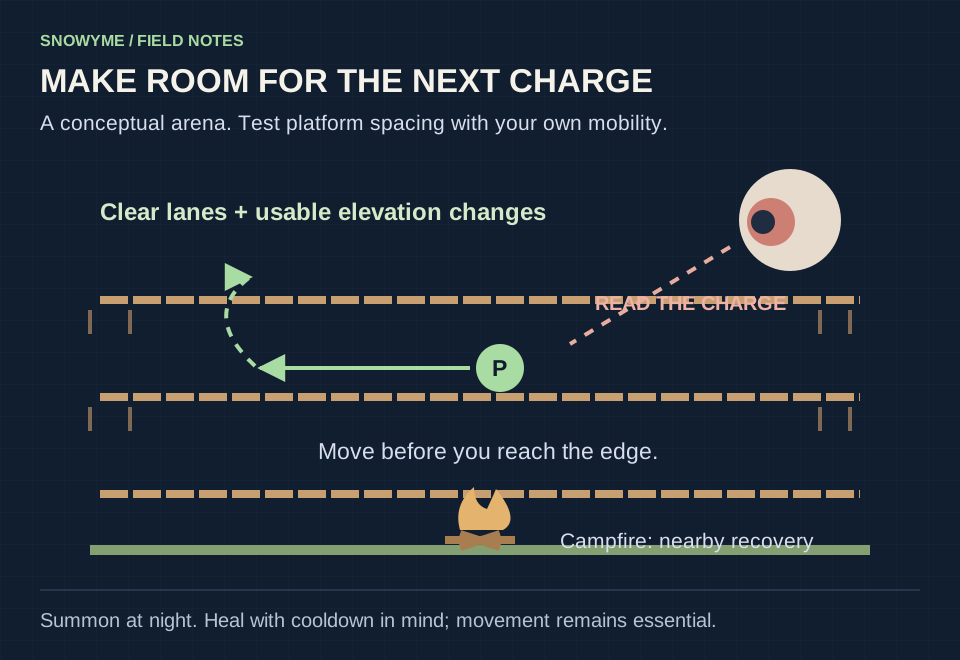
Build a few long, flat platform rows above or near a safe surface area. Leave enough vertical space to move between rows with your current jump tools, and enough horizontal room to avoid repeatedly reversing at an edge. The ideal dimensions depend on your mobility; test the route before the fight.
Remove trees, small terrain bumps, and other obstacles from the combat path. Add lighting so the boss and projectiles remain visible. A campfire provides a nearby regeneration buff, and later available support such as a Heart Lantern can add a different regeneration effect. Multiple campfires do not multiply the same buff indefinitely.
Place recovery support where you will actually remain in range. Do not build the fight around standing still beside it, however. Moving out of a charge is often worth more than maintaining a small regeneration effect for one extra moment.
8. Start at night and learn the fight in phases
The Eye of Cthulhu is a night boss. A Suspicious Looking Eye can summon it under the proper conditions; the familiar crafting route uses six lenses at a Demon or Crimson Altar, and the item can also be found through exploration. Do not destroy an altar simply because you need to craft at it.
Start near the beginning of the night so you have time. If you wait until dawn is close, the boss can leave before you finish. Clear ordinary nearby threats, check ammunition, heal to a useful level, and apply available buffs before triggering the encounter.
During its first form, keep moving and attack when the Eye is in a readable position. Manage the smaller servants without losing track of the boss. Avoid running the entire length of the arena without watching where the next charge will come from; movement should create space, not merely consume it.
The transformation changes the pace and attack pattern. Expect more emphasis on charges and less time for stationary actions. Expert and Master introduce more demanding behavior, so a calm Classic demonstration is not a promise of identical timings elsewhere. Watch the committed movement and use your arena’s length and elevation to avoid it.
Do not mash healing and expect it to solve every hit. Healing potions apply a cooldown effect, so there will be periods when you must survive without another immediate drink. If you repeatedly collide during a reversal, adjust where you turn or change platform level rather than buying more potions for the same path.
9. Turn a failed attempt into one useful upgrade
After a loss, identify the first repeatable cause. Running out of ammunition calls for supply preparation. Being trapped at the edge calls for an arena change. Taking avoidable hits while trying to use the hook calls for control practice. Low damage against a target you can already dodge calls for equipment or buff improvements.
Do not replace every part of the setup at once. Improve the main blocker, then try again. If the attempt ended at dawn, distinguish insufficient damage from simply starting too late. If you died with unused healing, move the item to a reliable hotkey and practice noticing health sooner.
After a victory, organize the drops and ask the Guide what the new materials enable. The next step depends on your world and preferred equipment. Hardmode begins through a later progression event, not because an arbitrary number of days passes or because you defeated this first boss. You can continue building a dependable world at your own pace.
Frequently asked questions
Must the Eye of Cthulhu be my first boss?
No. It is a common early target because its movement teaches useful fundamentals, but world conditions and discoveries can lead elsewhere. This guide gives you one coherent preparation route, not a rule that makes alternative orders invalid.
Why will an NPC not move into my house?
Use the housing query to check the room, then check the NPC’s individual arrival conditions. Missing background walls, unsuitable space, furniture problems, nearby evil biome influence, or unmet progression requirements can all matter. A visually attractive room is not automatically valid housing.
Do I need the best possible armor before trying?
No. A sensible armor set, improved health, movement, and a controllable arena often matter more than maximizing one stat. Prepare enough that you can observe and learn; then let the failed attempt reveal what actually needs work.
Is this arena safe against every later boss?
No. Later encounters have different movement, attacks, biome requirements, and space needs. Reuse the planning method—identify threats, prepare movement, test supplies—but redesign the terrain when the encounter requires it.
Sources & version notes
Use these references alongside the guide to check changing rules, availability, and update details. Community-maintained references are identified below. Strategy examples above are Snowyme's editorial guidance.
- Terraria official site ↗
Official game information and links to developer news and community resources.
- Official Terraria Wiki: Getting started ↗
Community-maintained official wiki with early-game progression and links to housing, equipment, and boss references.
An independent guide by Snowyme. Not affiliated with or endorsed by the game's publisher. Cover artwork is an original strategy illustration, not an in-game screenshot.