Baldur’s Gate 3: make every turn count in your first adventure
Understand Baldur’s Gate 3 with a spoiler-light guide to party roles, actions, concentration, positioning, spell choices, resting, and early combat recovery.
Take these into your next session
- Plan movement, action, bonus action, and reaction as separate resources.
- Protect concentration and remove enemy turns instead of spreading damage.
- Rest deliberately, read the environment, and inspect threats before committing.
What this guide covers An unmodded first playthrough on standard difficulty settings, focused on early combat and exploration. Honour Mode has additional rules, and class features can override general examples. No major plot outcomes or companion quest solutions.
Baldur’s Gate 3 can make a small fight feel complicated because several systems act at once: movement, actions, spell slots, concentration, elevation, and surfaces. The solution is not memorizing every spell. It is learning a short decision process that turns those systems into useful options.
This guide stays close to the early adventure and avoids major story outcomes. It shows how to construct a dependable party, read a combat encounter, and choose a useful turn even when you do not know the perfect build. The examples use ordinary actions rather than relying on rare equipment, surprise exploits, or a specific companion’s quest rewards.
1. Build a party with complementary jobs
A standard party can contain four characters. Think in jobs before classes: someone who can survive pressure, someone who deals reliable damage, someone who changes the battlefield, and access to recovery and useful exploration skills. A character can cover more than one job, so you do not need a rigid tank–healer–two-damage formula.
A fighter with an appropriate weapon can provide dependable attacks and stand near threatened allies. A cleric can support, heal, and contribute damage or control. A rogue can offer skills and effective focused damage when Sneak Attack conditions are met. A wizard can supply adaptable spells. This is an understandable learning arrangement, not the only strong party.
Avoid assuming enemies must attack a “tank.” Position and abilities can influence what is practical, but many enemies can move past your sturdy character or attack at range. Your fragile caster needs actual protection: distance, interrupted sightlines, control effects, or teammates able to punish an approach.
Early single-class progression is easier to understand than a build that multiclasses before its key features arrive. Important power increases often occur around class level five, such as Extra Attack for several martial classes or third-level spells for full casters. The details vary by class; delaying those features for a minor early combination can make learning harder.
2. Read the turn interface before spending anything
Your turn commonly includes movement, an action, and a bonus action, with reactions governed separately. Extra features can modify these resources, so read the character’s actual interface. A bonus action is not a second universal action: you cannot use it for any command you like just because the main action is already spent.
Movement can usually be split around other actions. You might move into range, attack, then use the remaining distance to reach safer ground. Check whether leaving an enemy’s melee reach risks an opportunity attack. Disengage can prevent those attacks for the movement it covers, but has a cost unless a class feature changes it.
Jumping can solve terrain problems but consumes a bonus action and some movement. Dashing generally spends an action to extend movement, while certain class features offer alternatives. Shoving uses a bonus action in the base rules and depends on its own checks and restrictions. None of these is free simply because it does not look like a weapon attack.
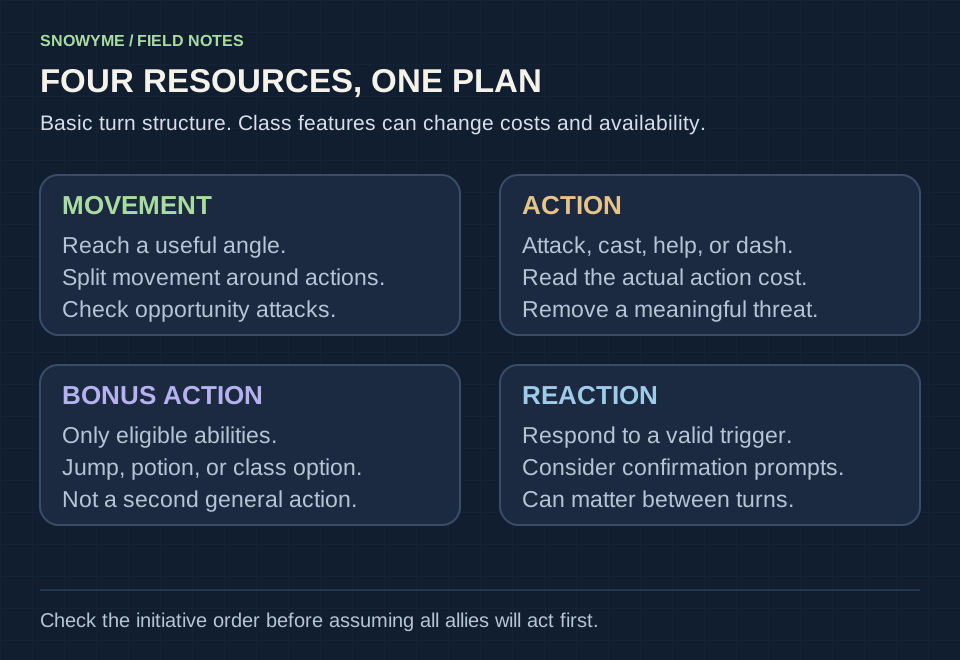
Set important reactions to ask for confirmation where the interface allows it. This helps you learn when they trigger and prevents a valuable reaction from being spent on a low-priority opportunity. Reaction availability matters between turns; it is not a button that must be used before you end the current one.
3. Inspect the enemy and the space around them
Before a difficult fight, examine opponents for resistances, conditions, and dangerous features. If your favored damage type is resisted, change the plan rather than repeating weaker attacks. An enemy’s armor or saving throws may also suggest whether a weapon attack, a saving-throw spell, or a utility action is more dependable.
Look at the ground and access routes. Ladders, doorways, cover, height, explosive objects, and difficult terrain can change how many enemies can reach you. Ranged attacks can benefit from high ground, but height does not make a character untouchable or replace checking line of sight.
Ungroup the party for delicate movement so everyone does not automatically follow through a trap or hazardous surface. Enter turn-based mode when precise movement matters, while remembering that it is not a universal pause for every distant event. Positioning before contact is useful when the situation allows it; do not assume every conversation gives you unlimited setup time.
Read prompts before interacting with an obviously urgent scene. The game is generous about exploration in many places, but some events can advance after time, resting, or moving to another region once they are triggered. A spoiler-free guide cannot promise that every unresolved situation waits forever.
4. Concentration: one important effect, protected well
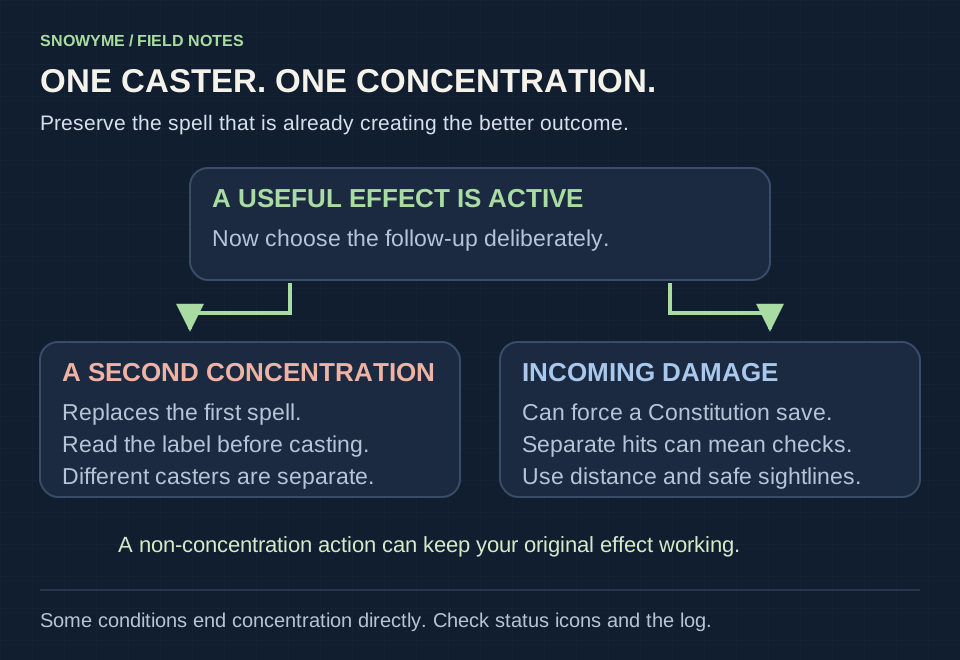
Many powerful spells require concentration. A character normally maintains only one concentration spell at a time. Casting another concentration spell ends the first, even if you hoped the effects would stack. Read the concentration label before switching to a new attractive option.
Taking damage can force a Constitution saving throw to maintain concentration. The standard difficulty is 10 or half the damage taken, whichever is higher. Several separate hits can create several checks, so a caster being repeatedly peppered by weaker attacks may still lose an important effect. Other conditions can end concentration directly.
Protect the caster after setting up the spell. Move them away from obvious threats, interrupt enemy sightlines, and avoid placing them where a shove can remove them from a safe ledge. A buff that would be excellent for several rounds does little if concentration ends immediately after casting it.
Separate concentration duties across characters when your composition permits it. One character can maintain a supportive effect while another controls a dangerous area. This works because they are different casters, not because you found a way to stack two concentration spells on one person.
5. Remove enemy turns instead of sharing damage evenly
An enemy with one hit point can often take the same meaningful turn as an enemy with full health. If two attacks can finish a dangerous target reliably, spreading those attacks across two healthy enemies may allow both to act. Focused damage is valuable because it changes the next round’s action balance.
Control can accomplish the same thing without reducing health to zero. A well-chosen disabling spell, an obstructed approach, or difficult terrain may prevent more incoming damage than a small direct attack. Check the target’s immunity, save chance, and the effect’s conditions before assuming control will land.
Choose between a high-value uncertain result and a lower-value reliable result deliberately. If a dangerous enemy must be stopped before its next turn, a dependable finish can be better than a spectacular attack with a poor hit chance. If the party is safe, a riskier attempt may be reasonable. The combat preview gives information, not certainty.
When adjacent allied portraits share initiative and the interface allows their turns to interleave, coordinate them. One ally may create an opening or apply a condition before another attacks. Do not assume every party member always gets a full turn before the enemies; the initiative order explains which opponents can interrupt your plan.
6. Learn attack rolls, saving throws, and advantage separately
An attack roll tries to meet or exceed a target’s Armor Class. A saving-throw spell instead asks the target to resist using a particular ability against the spell’s difficulty. A heavily armored enemy is not automatically resistant to every kind of magic, and a lightly armored enemy may have an excellent relevant save.
Advantage on a roll means rolling twice and taking the better result; disadvantage uses the worse. Multiple ordinary sources do not stack into three or four dice, and advantage and disadvantage generally cancel. Read the displayed reasons when your hit chance seems unexpectedly poor.
For a rogue, Sneak Attack requires suitable weapons and qualifying conditions. Advantage is one common route, while an appropriate nearby ally can create another when the other restrictions are satisfied. You do not need to hide every turn if another valid setup exists, and simply standing behind an enemy is not a universal backstab rule.
Avoid importing every tabletop assumption unchanged. Baldur’s Gate 3 adapts many rules, including some action costs and interactions. The game’s current tooltip and combat log are better evidence for what happened than a remembered rule from another edition or a different role-playing game.
7. Use spell slots and consumables when they solve a problem
Cantrips give many spellcasters repeatable options without spending a spell slot, but their range, damage, and accuracy still matter. Leveled spells should serve a purpose: remove a threat, prevent several attacks, create control, or recover an ally who can contribute. Saving every slot while the party collapses is not efficient resource management.
| Situation | A useful type of response | Check before committing |
|---|---|---|
| One dangerous enemy is nearly defeated | A reliable finishing attack or spell | Hit chance, damage range, and whether the target acts next. |
| Several enemies must cross a narrow approach | Area control or a carefully placed surface | Concentration, allied movement, and enemy resistances. |
| An ally is downed but can be reached safely | Help or appropriate healing | The action cost and whether the revived ally will be hit again immediately. |
| A caster is maintaining a valuable effect | Safer movement plus a non-concentration option | Whether the next spell would cancel the first. |
| The party is depleted before a new encounter | Rest or change the route if the scene permits | Urgent events and available camp supplies. |
Healing Word is useful when available because its range and bonus-action cost can recover an ally while preserving another action, but it still consumes resources and has restrictions. Do not build a plan around repeatedly reviving someone in the same lethal position without changing the threat that downs them.
Use potions, scrolls, coatings, and special arrows for encounters where they materially improve the odds. Read each item’s targeting and action cost. Consumables carried to the end of the game without ever solving a problem have not saved you resources; they have simply remained unused.
8. Rest as part of the adventure, not as an admission of defeat
Short rests recover health and some class resources, while long rests restore a broader set of resources when properly supplied. Warlock spell slots and some martial features have different recovery patterns from ordinary spellcaster slots. Learn what your party actually regains before deciding another rest would be useless.
Take long rests when needed and pay attention to camp conversations. Camp is part of the story, and avoiding it indefinitely can make both combat and narrative progression less clear. At the same time, use judgment around situations that the game presents as immediately urgent.
Collect camp supplies without turning every crate into an obligation. You can send useful supplies to camp and manage inventory there. Check the rest screen’s requirements and selected supplies rather than assuming that the visible presence of food always means you have completed a full rest.
Before leaving camp, review prepared spells where your class permits changes, equipment proficiency, and obvious inventory problems. Accidentally wearing armor without proficiency or carrying a weapon that does not match the intended ability can undermine an otherwise sound plan.
9. Work through a difficult fight in two passes
On the first pass, diagnose the loss. Did the party start clustered under enemy area damage? Did you cancel concentration? Did a melee character spend every turn chasing while ranged enemies attacked freely? Did you try to heal more damage than the enemy could repeat? These are useful explanations because they suggest a change.
On the second pass, adjust only the major causes. Split the initial formation, move a caster to a safer line, focus the most disruptive enemy, or use a control spell at the choke. You do not need to respec the entire party after one poor encounter.
Save before uncertain exploration if that suits your chosen difficulty and playstyle. If you want to live with imperfect outcomes, that is also valid; use the game’s difficulty options to make the experience comfortable. A first playthrough is not required to be an Honour Mode optimization project.
Frequently asked questions
Do I need a dedicated healer?
You need access to recovery and a way to prevent the party from collapsing, but a character spending every action restoring small amounts of health is not always the answer. Reducing enemy turns, protecting concentration, using potions, and resting can contribute as much as healing spells.
Is multiclassing necessary for a strong party?
No. Single-class characters can be effective and are easier to learn. Multiclassing changes feature and spell progression; choose it when you understand what you gain and delay. A build described as powerful at a high level can feel weak during the opening hours.
Why did my useful spell disappear?
Check whether it required concentration, whether the caster took damage or a disabling condition, whether its duration expired, and whether you cast another concentration spell. The combat log and status icons can identify the cause more reliably than guessing.
Should I reload every failed dialogue check?
That is a preference, not a requirement. Failed checks can lead to alternative outcomes, and the whole game is not built around passing every roll. If you reload, do it because that style is enjoyable for you, not because a single imperfect roll automatically ruins the run.
Sources & version notes
Use these references alongside the guide to check changing rules, availability, and update details. Community-maintained references are identified below. Strategy examples above are Snowyme's editorial guidance.
- Baldur’s Gate 3 official site ↗
Larian’s game information and links to official news and support.
- BG3 Wiki: Concentration ↗
Community-maintained rules reference for concentration, interruption, and relevant spell behavior; not a publisher-authored guide.
An independent guide by Snowyme. Not affiliated with or endorsed by the game's publisher. Cover artwork is an original strategy illustration, not an in-game screenshot.